Getting started: install TackOn and charge your first fee
TackOn adds an optional extra charge (shipping protection, gift wrap, a carbon offset, a handling fee) to a shopper's cart, shown as a small widget above the checkout button. The fee rides into the order as a hidden Shopify product, so it appears on the order, the receipt, and in payouts like any other line item. By the end of this guide you'll have a working rule, a live widget on your storefront, and a test order with a surcharge line on it.
Who this is for
- Anyone setting up TackOn for the first time
Time needed
- About 15 minutes, plus a test order
You'll need
- A Shopify store on an Online Store 2.0 theme (app embeds don't exist on older themes)
- Permission to install apps and edit the theme on that store
- A product you can add to the cart for testing
1. Install TackOn and open the Home dashboard
Install TackOn from the Shopify App Store like any other app, then open it from Shopify admin → Apps → TackOn. The left sub-nav has six items: Home, Analytics, Settings, Cart Widget, Billing, and Help Center.
⚠️ Heads up: Always open TackOn from Apps → TackOn in your Shopify admin, then move around using the left nav and the settings tabs. Pasting a section URL straight into the address bar loads it outside the admin, where it can't see your store.
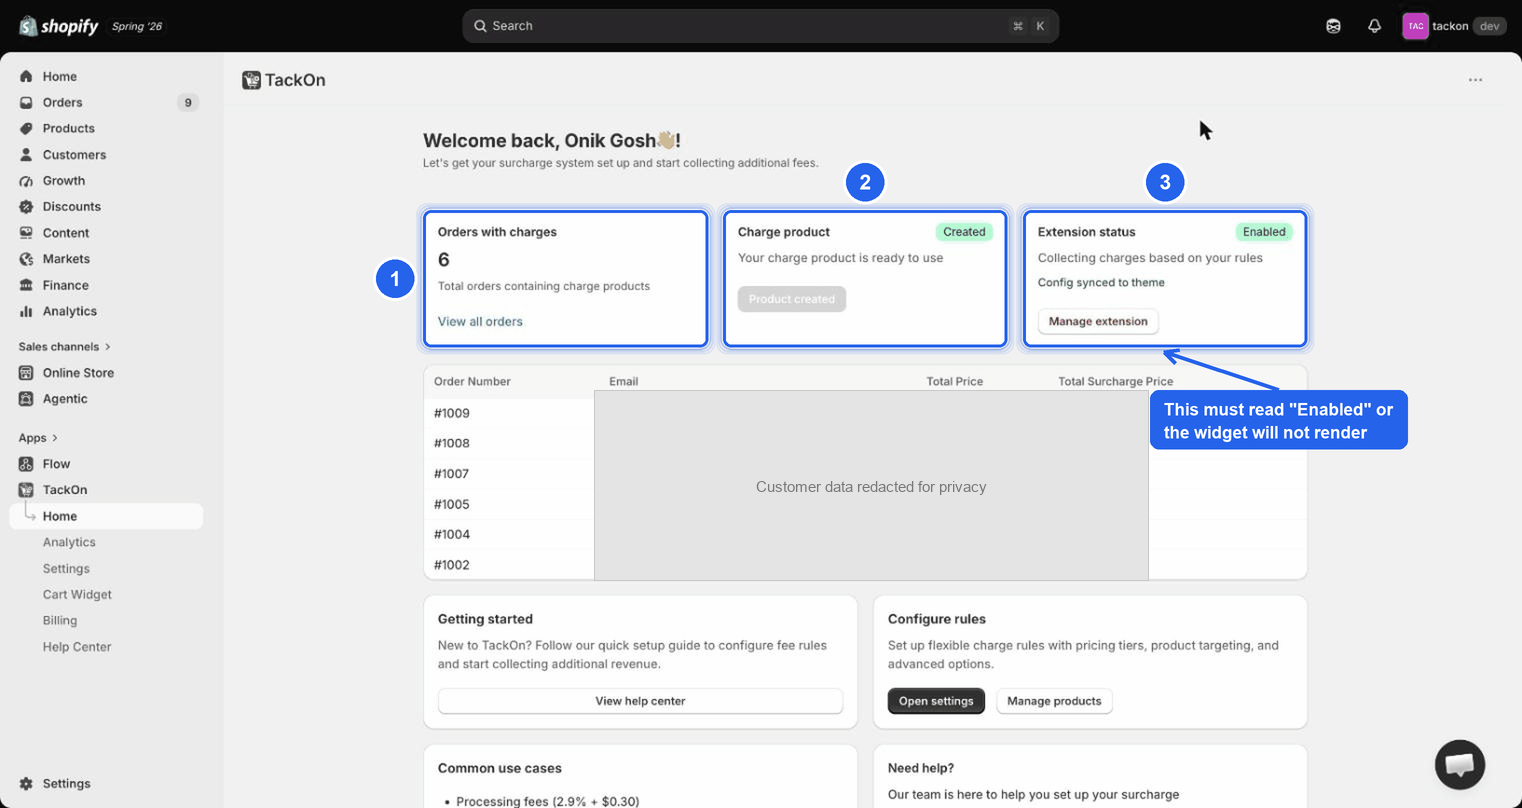 Three cards across the top tell you the state of the install at a glance. Read them left to right before touching anything else.
Three cards on Home tell you whether the install is healthy:
| Card | What it means |
|---|---|
| Orders with charges | A count of orders that contain a charge product, with a View all orders link. Zero is normal on a fresh install. |
| Charge product | Shows a Created badge and "Your charge product is ready to use". This is the hidden product that carries the fee onto the order. |
| Extension status | Shows Enabled plus "Collecting charges based on your rules" and "Config synced to theme" once the theme app embed is on. There's a Manage extension button here. |
If Extension status doesn't read Enabled, section 3 is the fix.
2. Create your first charge rule
A rule decides how much to charge. Go to Settings → Rules → + Create Rule.
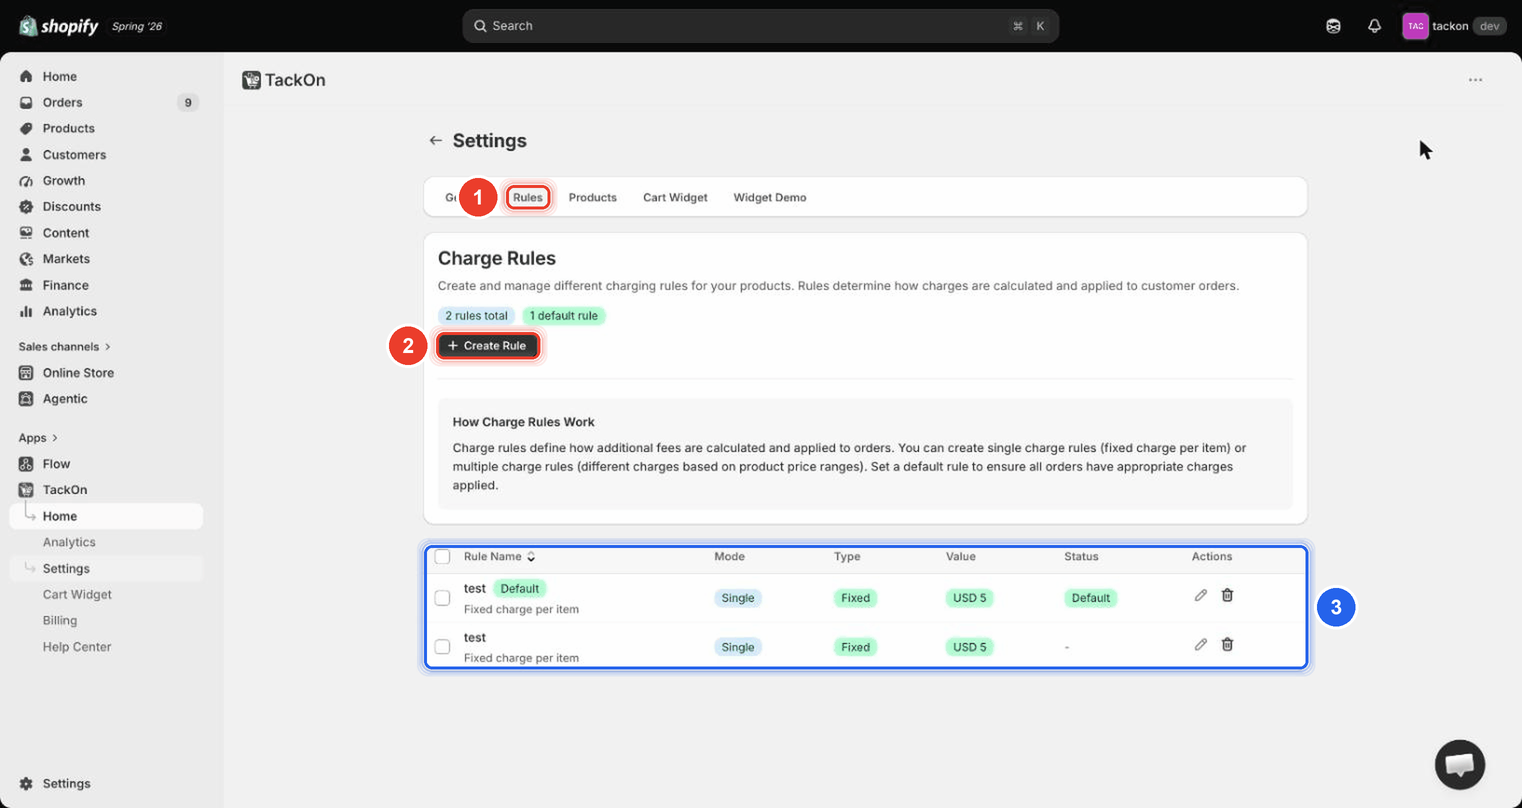 Marker 1 is the Rules tab; marker 2 is the + Create Rule button; marker 3 is the table where saved rules land (Rule Name, Mode, Type, Value, Status, Actions).
The form opens as an inline panel titled Create Charge Rule above the table. It isn't a popup, so scroll up if it looks like nothing happened.
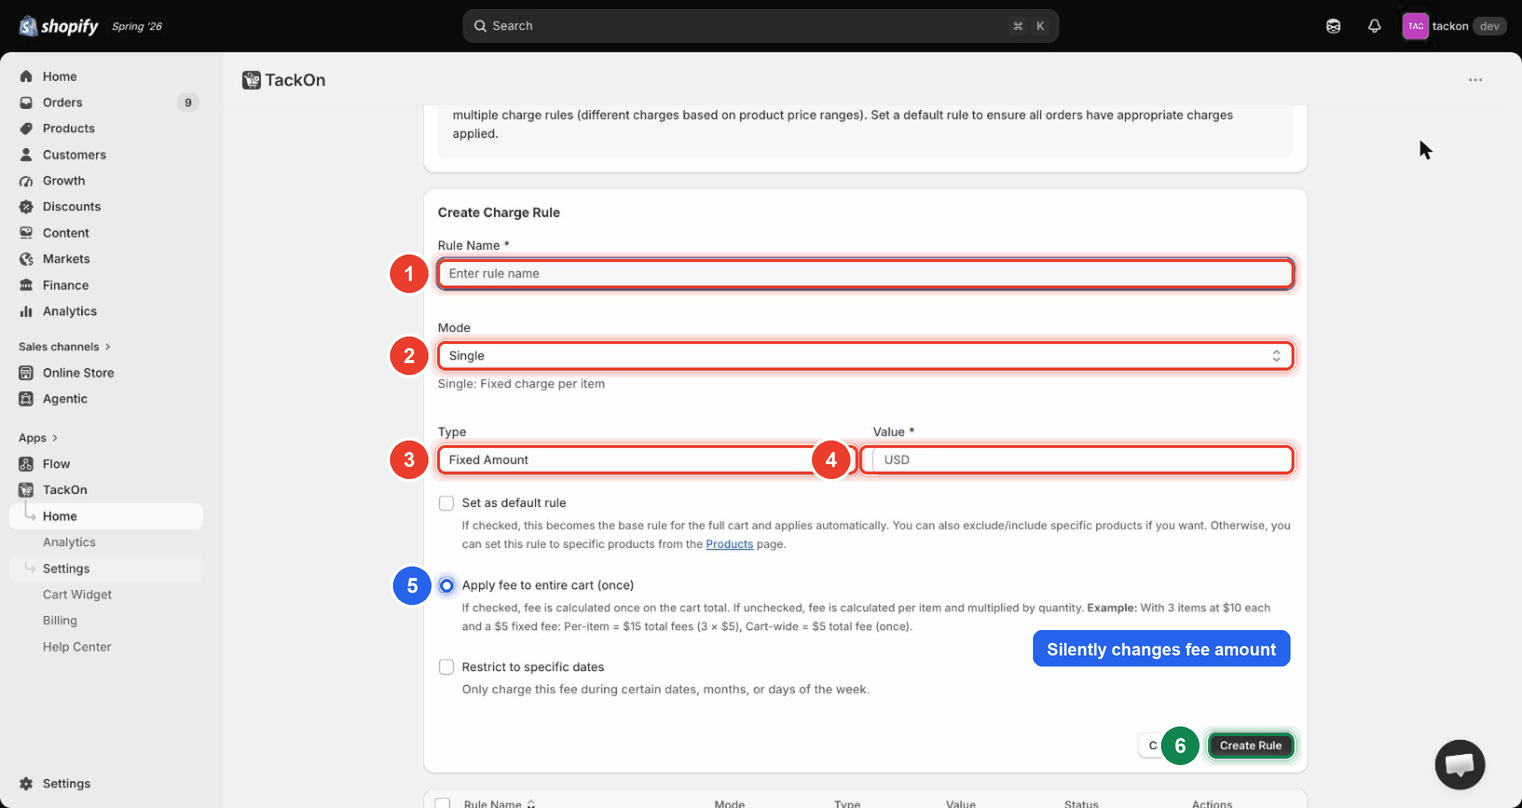 *Markers 1–4 are the four fields you need: Rule Name, Mode, Type, Value. Marker 5 flags Apply fee to entire cart (once). Leave it alone for now: it silently changes the amount charged. Marker 6 is the Create Rule button.*
Fill it in
- Rule Name: anything you'll recognise later, for example
Shipping protection. - Mode: leave it on Single ("Single: Fixed charge per item").
- Type: choose Fixed Amount.
- Value: the amount. The placeholder shows the store's currency, e.g.
USD. - Tick Set as default rule. This makes it the base rule for the whole cart, applied automatically.
- Leave Apply fee to entire cart (once) unticked for a first test, and leave Restrict to specific dates unticked.
- Click Create Rule.
The rule appears in the table with a green Default badge.
⚠️ Heads up: Apply fee to entire cart (once) changes the money, so set it deliberately. Unticked, the fee is charged per item and multiplied by quantity; ticked, it's charged once on the cart total. With 3 items at $10 each and a $5 fixed fee: per-item = $15 in fees, cart-wide = $5.
⚠️ Heads up: A rule with Set as default rule ticked cannot be bound to specific products. For a product-specific fee you need a second, non-default rule. See Product-specific fees.
3. Turn on the theme app embed: this is the step people get wrong
TackOn is a theme app embed. Its extension targets body, which means it loads on every page and finds the cart elements on its own using theme selectors. There is nothing to place on the cart page. Turning the embed on is the whole install.
- Shopify admin → Online Store → Themes.
- Click Edit theme on the live theme.
- In the theme editor's left icon rail, open the App embeds panel, the third icon in the rail (the puzzle-piece icon).
- Find the TackOn Cart Widget row and switch its toggle on.
- Click Save. Nothing takes effect until you do.
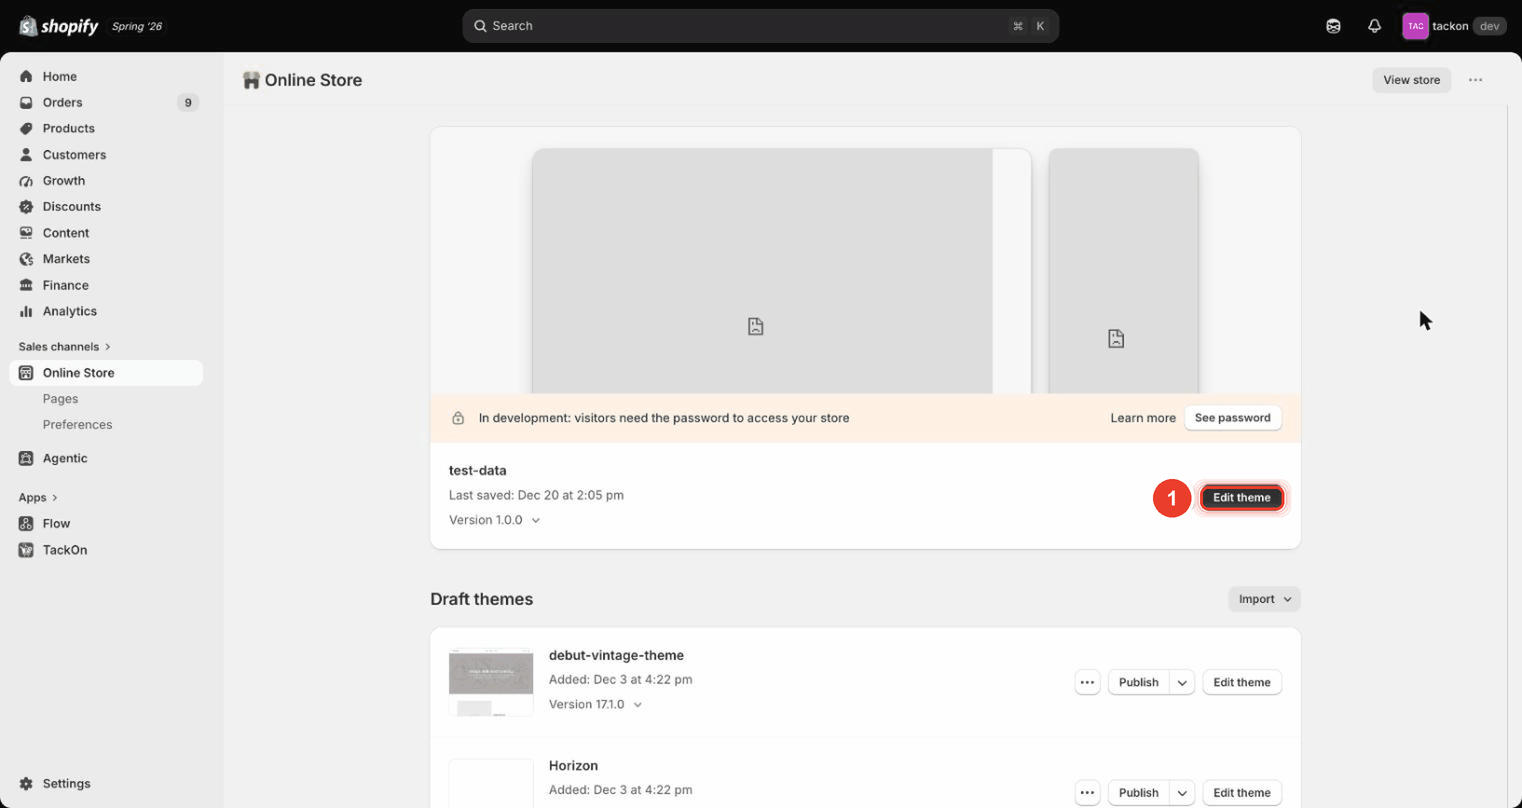 Steps 1–2. Marker 1 is the Edit theme button on the active theme, the way into the theme editor.
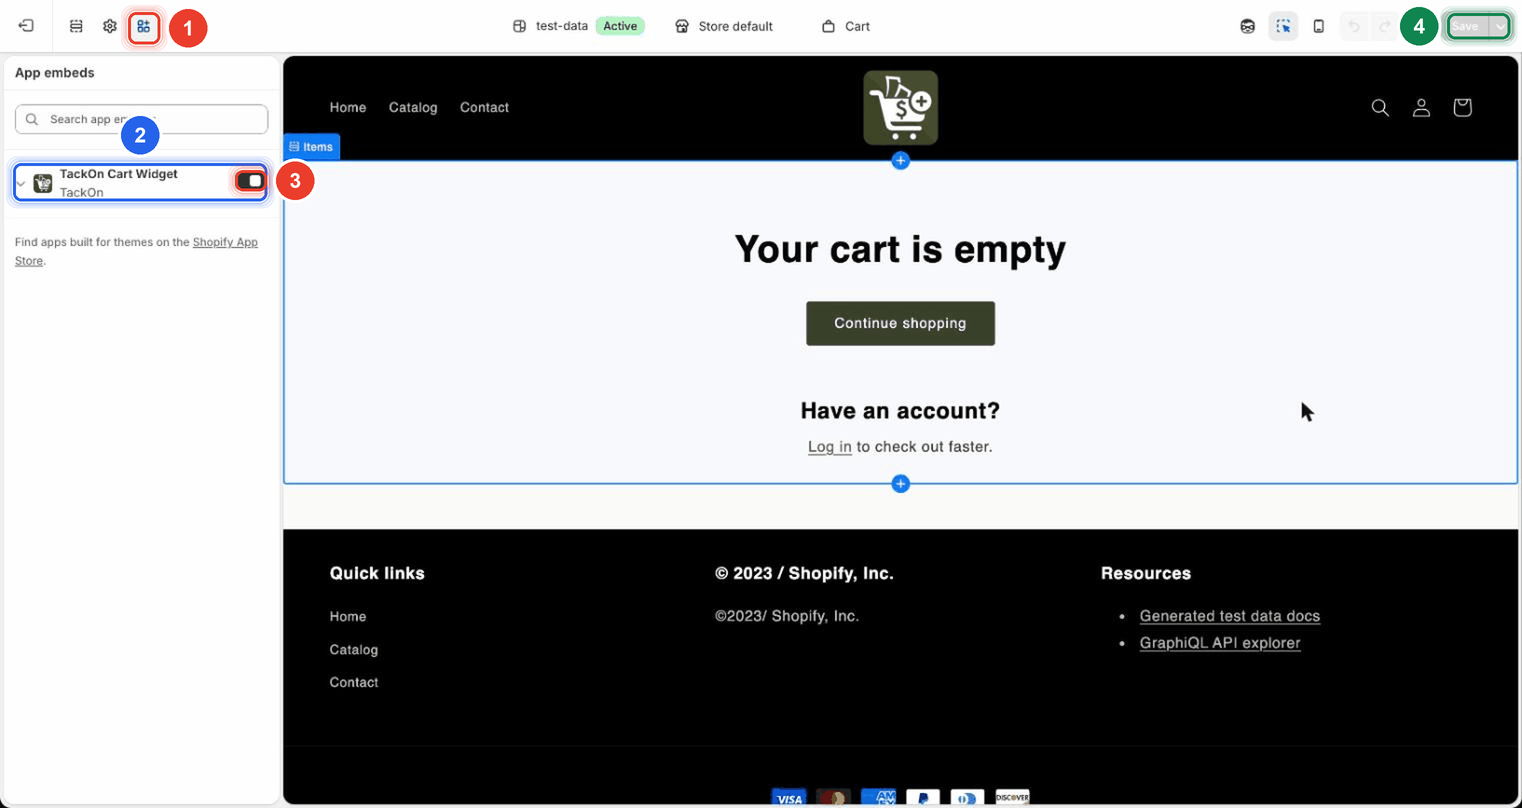 Steps 3–5. Marker 1 opens App embeds; marker 2 confirms TackOn Cart Widget is present; marker 3 is the toggle that actually enables it; marker 4 is Save. Skipping it is the single most common reason the widget never shows up.
⚠️ Heads up: TackOn ships no cart-page block at all. App embeds is the only place it appears. If you're hunting through Add block for a TackOn widget, that's why you can't find one.
Back in the app, Home → Extension status should now read Enabled.
4. Pick a widget template
Go to Settings → Cart Widget (or the Cart Widget item in the left nav).
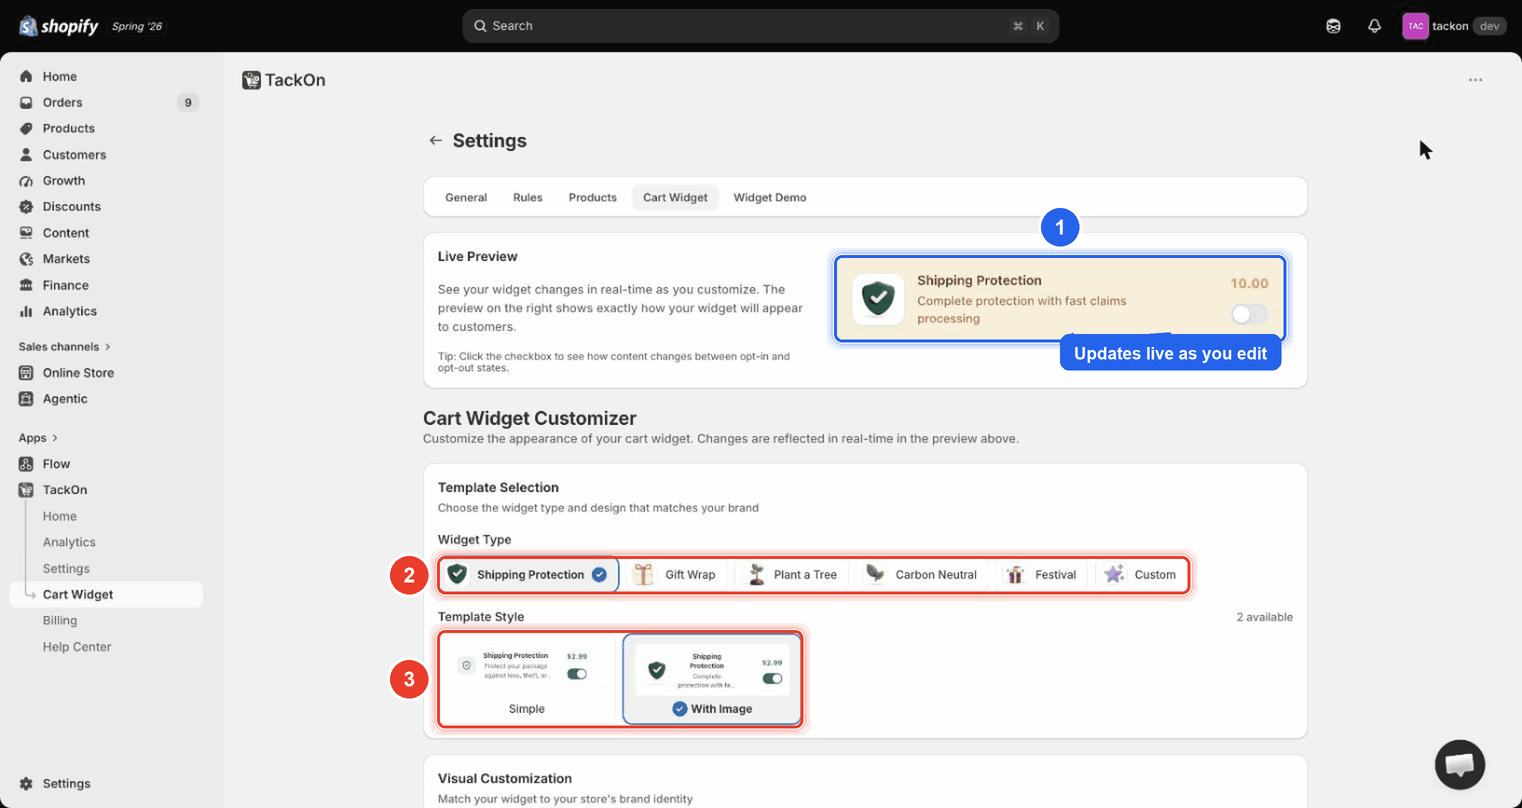 Marker 1 is the Live Preview, which redraws immediately as you edit. Marker 2 is the Widget Type chip row; marker 3 is Template Style.
Choose a Widget Type: Shipping Protection, Gift Wrap, Plant a Tree, Carbon Neutral, Festival, or Custom. Then pick a Template Style: Simple or With Image. Colours and copy are covered in Designing the cart widget.
Then click Save.
⚠️ Heads up: The Live Preview updates the moment you click a chip, but that is local to the admin page: nothing reaches the storefront until you save. A save bar appears at the top as soon as you change anything, and the page's own button reads Save while there are unsaved changes and Saved once there aren't. If you picked Gift Wrap and the cart still shows Shipping Protection, this is almost always why.
⚠️ Heads up: There are six widget types, not five. Festival is easy to overlook in the chip row.
5. Test it end to end
- Open the storefront and add any product to the cart.
- Open the cart page or cart drawer. The widget renders above the checkout button.
- Tick the widget's checkbox. The cart total goes up by the rule's value.
- Untick it. The total goes back down.
- Check out and complete the order.
- In Shopify admin → Orders, open the order and confirm the surcharge line is there.
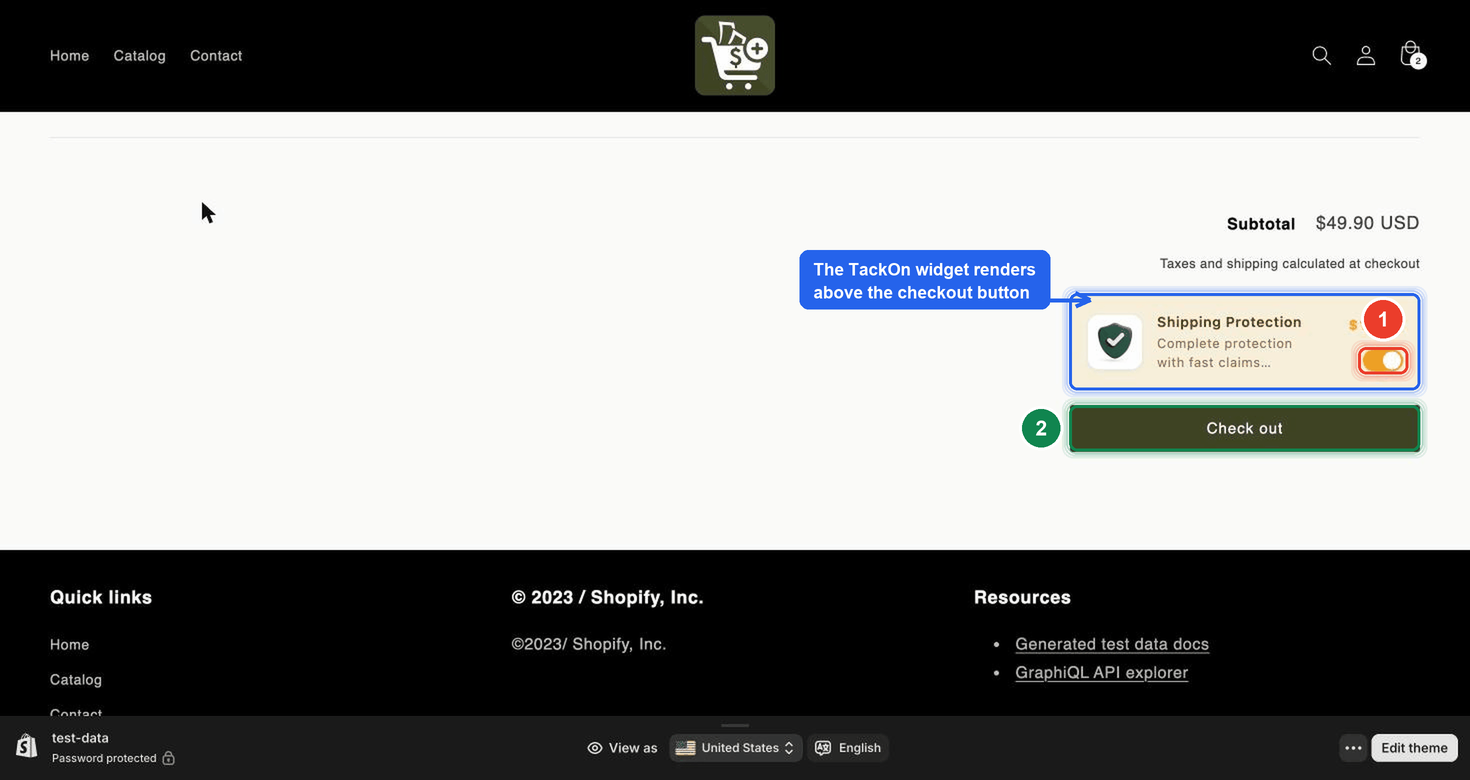 This is what a shopper actually sees. Marker 1 is the toggle they tick to opt in; marker 2 is the Check out button the widget always sits above. If the widget renders here, the app embed and the rule are both working.
Back in TackOn, Home → Orders with charges increments, and the recent orders table shows Order Number, Email, Total Price, and Total Surcharge Price.
6. Where the fee shows up
The fee is carried by a hidden Shopify product that TackOn adds to the cart. Its name is set at Settings → General → Product title, and it defaults to Surcharge. The field's own helper text says it plainly: "This title will appear in customer orders and receipts."
If you want customers to see "Shipping Protection" rather than "Surcharge" on their receipt, that's the field to change.
Troubleshooting
| Symptom | Likely cause | Fix |
|---|---|---|
| Widget doesn't appear on the cart at all | The theme app embed is off, or Save was never clicked in the theme editor | Theme editor → App embeds → toggle TackOn Cart Widget on → Save. Confirm Extension status reads Enabled on Home. |
| Widget doesn't appear, and the embed is on | The embed was enabled on a theme that isn't live | Enable it on the live theme. Check Settings → General → Theme Selectors for Active Theme and Synced Themes, then click Sync Theme Selectors. |
| Widget appears but no fee is added | No rule has Set as default rule ticked, so nothing applies cart-wide | Settings → Rules: the rule should show a green Default badge. Edit it and tick Set as default rule if it doesn't. |
| Widget disappeared on its own | Restrict to specific dates is on and the schedule window isn't active. Or Enable Visibility Rules is hiding it | Check the rule's schedule (it's evaluated in the shopper's browser time, not the store's), then check Settings → General → Visibility Control Rules. See Scheduling, visibility rules, and troubleshooting. |
| Fee looks doubled or tripled | Apply fee to entire cart (once) is unticked, so the fee is charged per item × quantity | Edit the rule and tick Apply fee to entire cart (once) to charge once on the cart total. |
| Amount is wrong for one product only | A non-default rule is bound to that product and overrides the default | Settings → Products: check the bindings. Product rules always win over the default rule. |
| Amount is wrong across the store | Type is set to Percentage or Combined (% + Fixed) when you wanted a flat fee | Edit the rule, set Type to Fixed Amount, and re-check Value. See Fee types and price tiers. |