Product-specific fees: binding rules to individual products
Most TackOn stores start with one fee that applies to the whole cart. Sooner or later you want something narrower: a handling fee on breakables only, or gift wrap that costs more on big items. That is what product binding is for: you attach a charge rule to specific products, and those products stop using the store-wide default. This guide covers how the override resolves, the constraint that traps nearly everyone the first time, the click-by-click steps, and two worked examples.
Who this is for
- Anyone who wants a fee on some products but not all
- Anyone asking "why is this fee on everything?" or "why isn't my rule in the dropdown?"
Time needed
- About 10 minutes for a single product-bound rule
You'll need
- Access to Shopify admin → Apps → TackOn
- The list of products the fee should apply to
- The TackOn widget already enabled on the theme (see Getting started: install TackOn and charge your first fee)
Navigate using TackOn's own left nav and tabs. Typing a settings URL straight into the address bar drops the embedded session and lands on a "Shop domain / Log in" screen.
1. How the override works
TackOn has exactly two kinds of charge rule, and the difference decides everything else in this guide.
Both are created the same way, in Settings → Rules → + Create Rule. One checkbox separates them.
| Default rule | Product-bound rule | |
|---|---|---|
| Set as default rule | Ticked | Left unticked |
| Applies to | Every product automatically | Only products it is bound to |
| Bound from | Cannot be bound | Settings → Products → + Bind Product |
| Status column shows | Green Default badge | - |
The app states the precedence itself, in the How Product Rules Work panel on the Products tab:
"When a product has a specific rule bound to it, that rule will override the default charge rule. Products without specific bindings will use the default charge rule from the Rules tab."
So: a product with a binding uses that binding. Everything else falls back to the default rule. There is no third case to reason about.
2. The trap: a default rule cannot be bound
This is the single most common stumbling block with this feature. From the same panel:
"Note: Default rules cannot be bound to specific products as they apply automatically to all products. Only non-default rules can be bound to individual products."
It is easy to create one rule, tick Set as default rule because it sounds sensible, then go to the Products tab and find that rule nowhere in the rule picker. Nothing is broken. A default rule is excluded on purpose, because it already covers every product.
The fix is always the same: they need a second rule with Set as default rule left unticked. Keep the default rule as the store-wide baseline (or delete it if the fee should land on bound products only) and create a separate non-default rule for binding.
⚠️ Heads up: If your rule doesn't show up when you try to bind it, check the Status column on the Rules tab first. A green Default badge is almost always the reason.
3. Create the non-default rule
3.1 Open the Rules tab
Go to Settings → Rules. The header shows two counters, N rules total and N default rule, so you can see at a glance whether a default already exists.
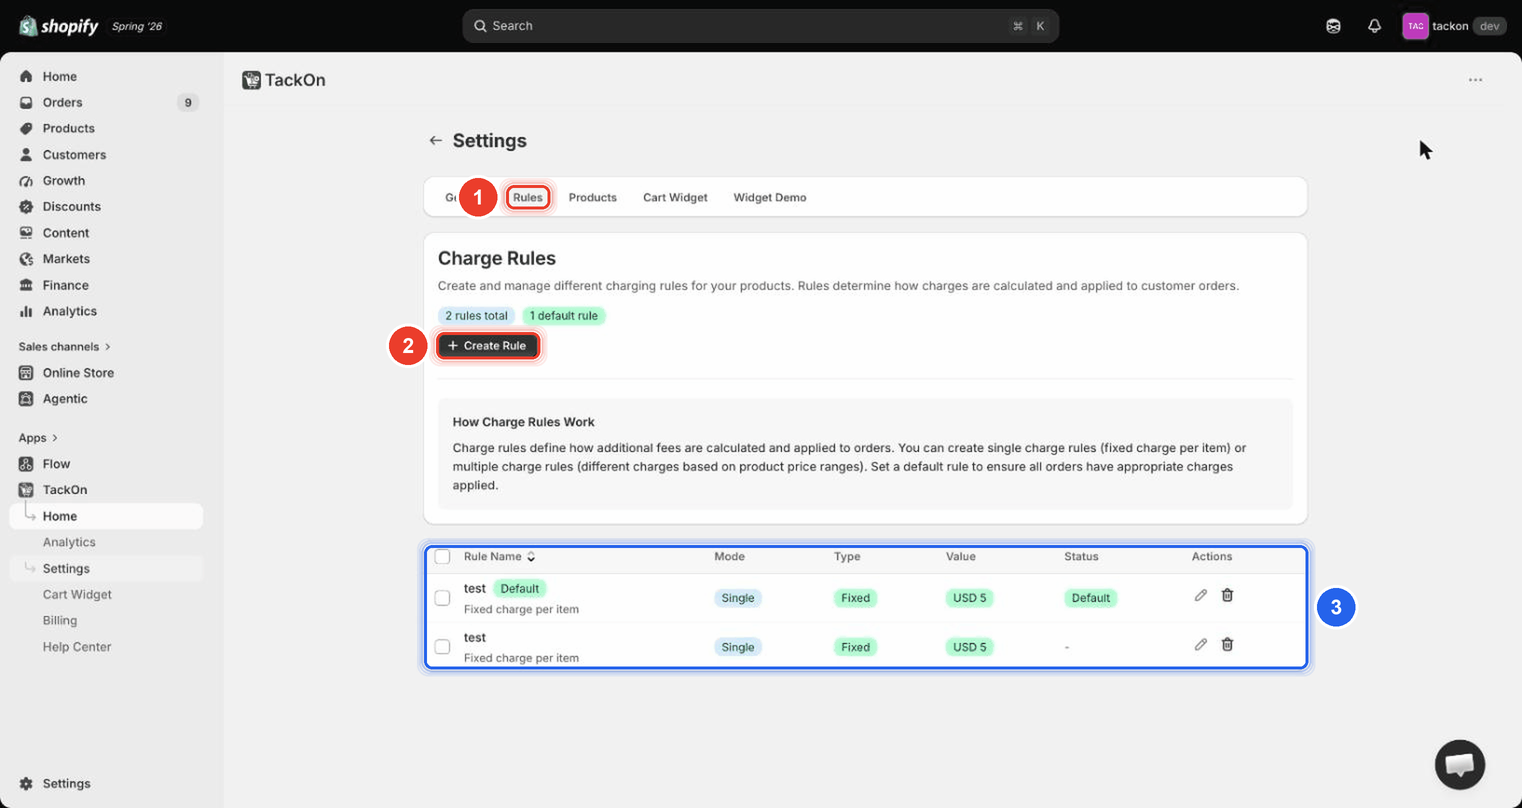 Marker 1 is the Rules tab; marker 2 is + Create Rule; marker 3 is the rules table. Note the green Default badge in the Status column on the first rule and the
 - on the second. Only the second kind can be bound to products.
3.2 Fill in the rule
Select + Create Rule. An inline panel titled Create Charge Rule opens above the table (it is not a modal, so scroll up if you don't see it).
- Rule Name: something you'll recognise later, like
Fragile handling - Mode:
Singlefor one flat charge per item,Multiplefor price tiers - Type:
Fixed Amount,Percentage, orCombined (% + Fixed) - Value: the amount; the placeholder shows the store currency
- Set as default rule: leave this unticked
- Apply fee to entire cart (once): leave unticked so the fee is calculated per item and multiplied by quantity, which is normally what a per-product fee should do. Ticking it calculates the fee once on the cart total instead
Select Create Rule to save.
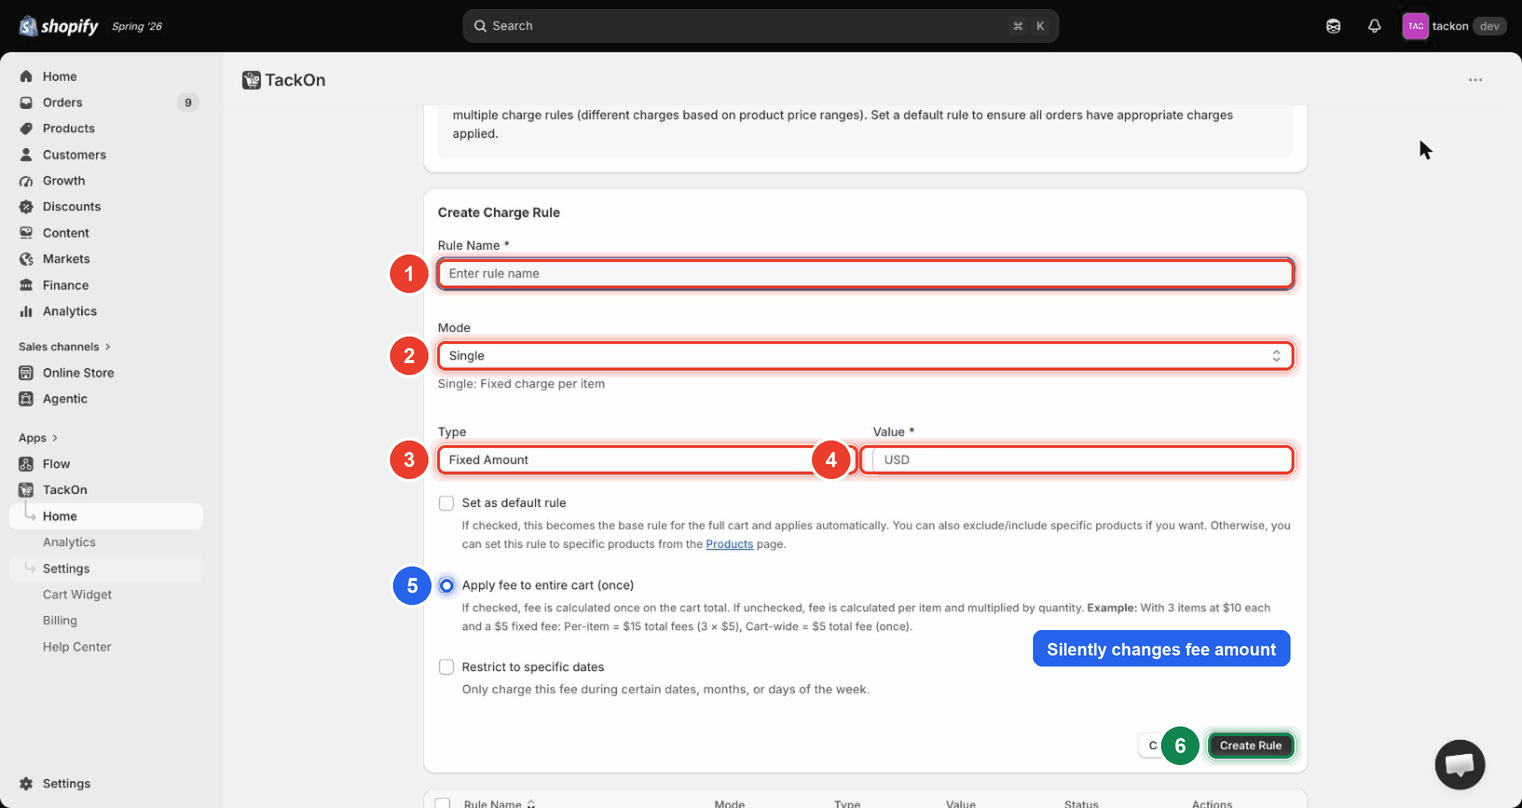 *Markers 1–4 are Rule Name, Mode, Type and Value. The Set as default rule checkbox just below marker 4 is deliberately left unticked. That is what makes this rule bindable. Marker 5 is Apply fee to entire cart (once), which silently changes the amount charged; marker 6 is Create Rule.*
⚠️ Heads up: The full on-screen type labels are Fixed Amount and Combined (% + Fixed). Merchants often shorten them to "Fixed" and "Combined".
4. Bind the rule to products
4.1 Open the Products tab
Go to Settings → Products. The page is titled Product Charge Rules with the subtitle "Bind specific products to charge rules to customize pricing behavior." Before any bindings exist, the table shows No product rules configured yet.
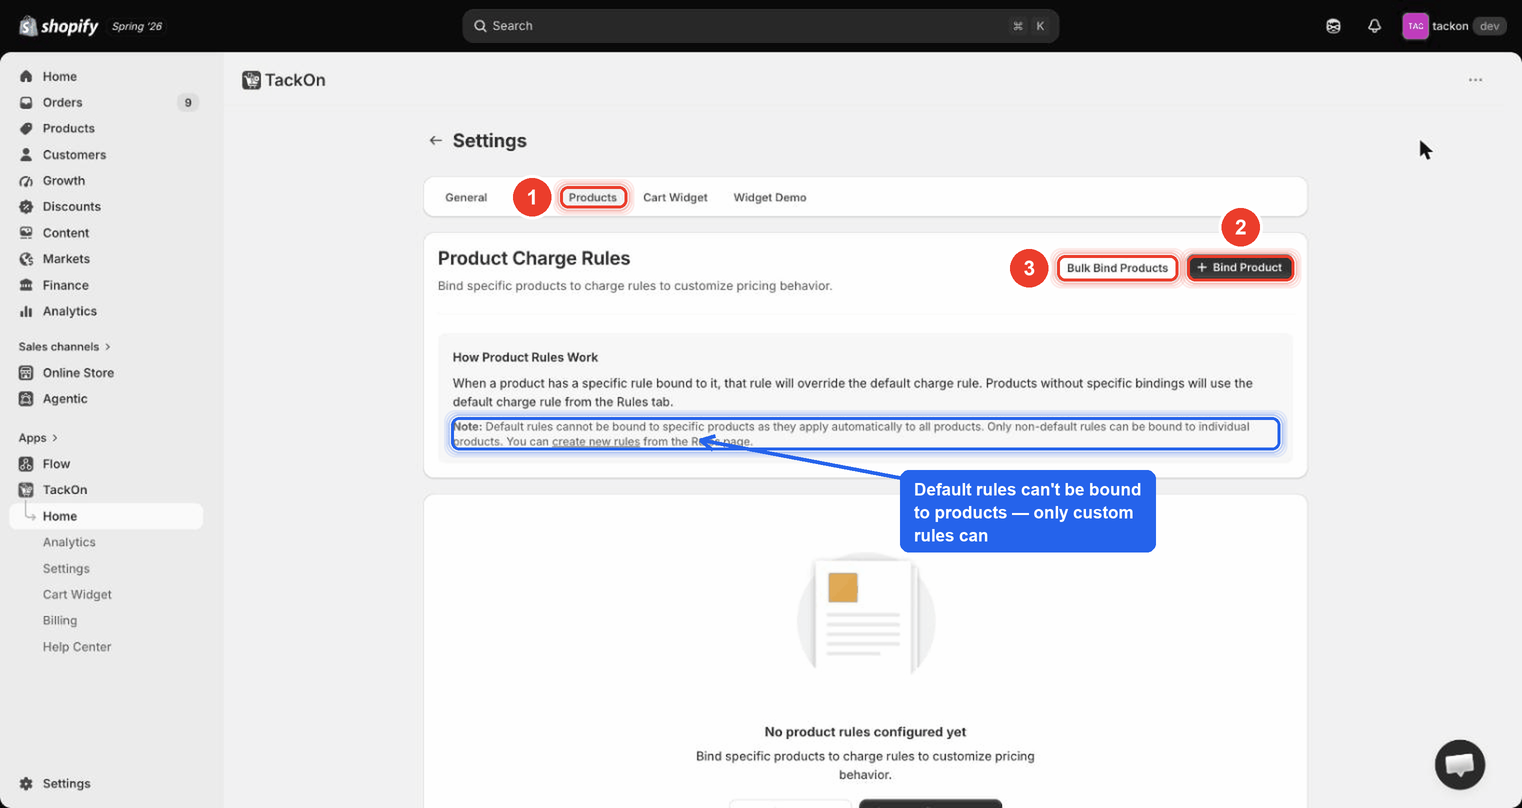 Marker 1 is the Products tab, marker 2 is + Bind Product, marker 3 is Bulk Bind Products. The blue callout points at the note explaining that default rules cannot be bound.
⚠️ Heads up: There are two binding buttons: + Bind Product for one product at a time, and Bulk Bind Products for many at once.
4.2 Bind one product
- Select + Bind Product.
- In the binding panel, open the product picker. An Add product modal appears.
- Use Search products to find the item, then tick its checkbox. The counter at the bottom left tracks how many are selected.
- Select Add to return to the binding panel.
- Choose the charge rule to apply. Only non-default rules appear here.
- Select Bind Product to save. Cancel backs out without saving.
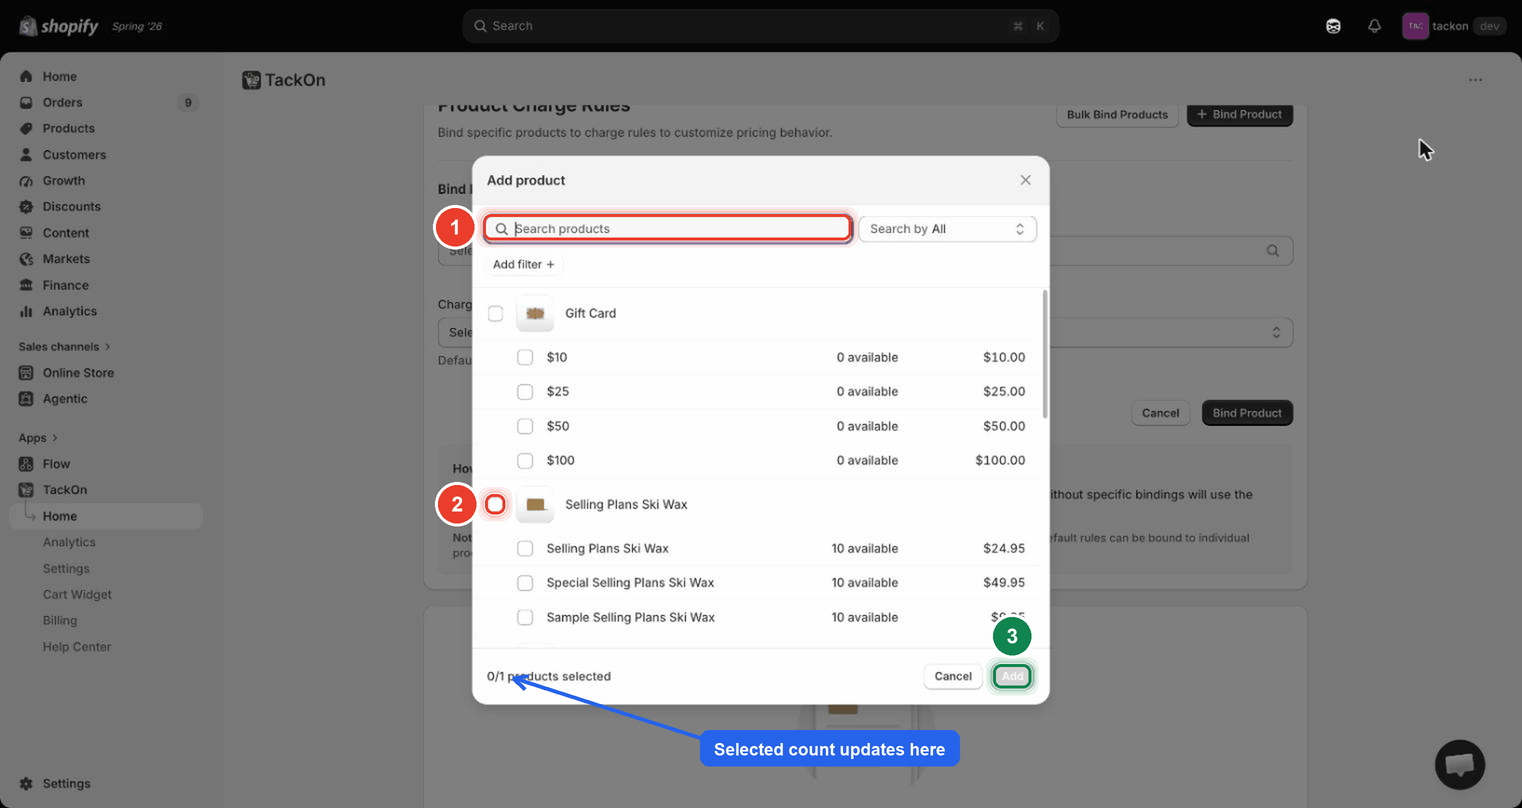 Marker 1 is Search products; marker 2 is the checkbox on a product row; marker 3 is Add. The callout points at the selected-count line, which is the quickest way to confirm the right number of items is picked before adding.
4.3 Bind many at once
Bulk Bind Products is the same idea for a batch: pick the set of products, pick the rule, save once. Use it when a whole category needs the same fee.
5. What a mixed cart does
A cart holding both bound and unbound products is the normal case, and it resolves per product: bound products use their bound rule, everything else uses the default rule from the Rules tab. If no default rule exists, only the bound products carry a fee. Nothing stacks. A bound product does not also pick up the default rule. That is what "override" means in the app's own explainer.
Apply fee to entire cart (once) changes the arithmetic on top of that. Unticked, the fee is per item multiplied by quantity, so three glasses means three handling fees. Ticked, it is calculated once on the cart total. Merchants who expect one fee per fragile item and see a single charge have almost always ticked this box.
6. Worked examples
6.1 Fragile handling fee on glassware only
Say you want $4 per fragile item, and nothing on anything else.
- Settings → Rules → + Create Rule
- Rule Name
Fragile handling, ModeSingle, TypeFixed Amount, Value4 - Leave Set as default rule unticked; leave Apply fee to entire cart (once) unticked so each glass is charged
- Create Rule
- Settings → Products → Bulk Bind Products, pick every glassware product, pick
Fragile handling, save
With no default rule, only glassware carries a fee. With one, glassware uses Fragile handling and everything else keeps the default.
6.2 Gift wrap priced by item size
Say you want gift wrap to cost more on bigger, pricier items. Price tiers do this in one rule.
- Settings → Rules → + Create Rule
- Rule Name
Gift wrap, ModeMultiple(the form swaps to a Price-based Charge Rules block) - Fill in the tier cards, each headed Rule 1, Rule 2 and so on, using Min Price, Max Price, Type and Value (see the table below). Use + Add Another Rule for each new tier
- Leave Set as default rule unticked, then Create Rule
- Bind
Gift wrapto the giftable products on the Products tab
The tiers for step 3:
| Tier | Min Price | Max Price | Type | Value |
|---|---|---|---|---|
| Small | 0 | 24.99 | Fixed Amount |
2 |
| Medium | 25 | 74.99 | Fixed Amount |
4 |
| Large | 75 | 0 | Fixed Amount |
6 |
0 or an empty Max Price means "and above", which is how the large tier catches everything over $75. If the bands leave a hole, a Check your price tiers warning banner appears above the tier cards naming the uncovered range. It's advisory and the rule still saves, so read it rather than clicking past it.
⚠️ Heads up: each tier offers all three types:
Fixed Amount,Percentage, andCombined (% + Fixed). Choosing combined swaps the tier's Value box for Percentage and Fixed Amount fields.
Troubleshooting
| Symptom | Likely cause | Fix |
|---|---|---|
| The rule you want isn't in the rule picker when binding | The rule has Set as default rule ticked, and default rules cannot be bound | Either edit the rule (pencil icon in the Actions column on the Rules tab) and untick Set as default rule, or create a second, non-default rule for binding |
| The fee is applying to every product, not just the bound ones | The rule carries the green Default badge in the Status column, so it applies automatically store-wide | Untick Set as default rule on that rule, then bind it from Settings → Products |
| The fee doesn't appear on a bound product | The binding was saved against a different product, or the rule has Restrict to specific dates ticked and the window isn't active (an inactive schedule hides the widget entirely) | Check the binding on Settings → Products, then open the rule and check its schedule. Schedules use the shopper's browser time |
| A bound product and the default rule look like they're fighting | Both exist, which is expected: the bound rule always wins for that product | Confirm which rule carries the Default badge and which rule the product is bound to. If the amount is still wrong, check Apply fee to entire cart (once) on the winning rule |
| The fee amount is right but the total is not | Apply fee to entire cart (once) is ticked, so the fee is charged once on the cart total instead of per item × quantity | Untick it for per-item pricing, or leave it ticked if one flat fee is intended |